The External Display Dilemma for MacBook Users
As a MacBook Air M1 user, I was initially drawn to Apple's sleek design, impressive efficiency, and fluid ecosystem. However, as my workload grew more complex, the need for more screen real estate became undeniable. I set out to connect three external displays, expecting a straightforward setup—only to hit a roadblock.
Upon plugging in a second monitor, instead of extending my workspace, I was met with a mirrored display or, worse, no recognition at all. A deep dive into online forums confirmed my frustration: M1 and M2 MacBooks inherently lack support for multiple external displays due to hardware limitations. Even with multiple Thunderbolt 3 or 4 ports, these machines do not natively support Multi-Stream Transport (MST), a feature widely available on Windows PCs for handling multiple monitors over a single connection.
For reference, the following base Apple Silicon MacBooks support only one external display:
-
M1 MacBook Pro 13"
-
M2 MacBook Pro 13"
-
M1 MacBook Air
-
M2 MacBook Air
-
M3 MacBook Air (when the lid is open)
-
M3 MacBook Pro 14" (when the lid is open)
So, are Mac users doomed to a single external monitor? Fortunately, no. The solution lies in DisplayLink technology, a widely adopted method for enabling multiple external displays on Apple Silicon Macs.
How DisplayLink Works
DisplayLink technology operates through two core components:
-
A Virtual Graphics Card (VGC) Driver installed on the Mac, which acts as an additional GPU.
-
A Hardware Rendering Engine (HRE) embedded within the DisplayLink adapter or docking station.
The DisplayLink driver (VGC) intercepts GPU output, compresses the virtual screen data using an adaptive encoding algorithm, and transmits the compressed video stream over USB. The DisplayLink device then decompresses the data via HRE and converts the data into a standard DisplayPort or HDMI signal, allowing multiple external monitors to function seamlessly.
One of DisplayLink’s biggest advantages is USB 3.0 compatibility, meaning it doesn’t require Thunderbolt 3 or 4. Whether you're using USB-C, USB-A, or a Thunderbolt docking station, DisplayLink remains highly adaptable across different Mac setups.
TL;DR: The Solution for Multi-Display Mac Users
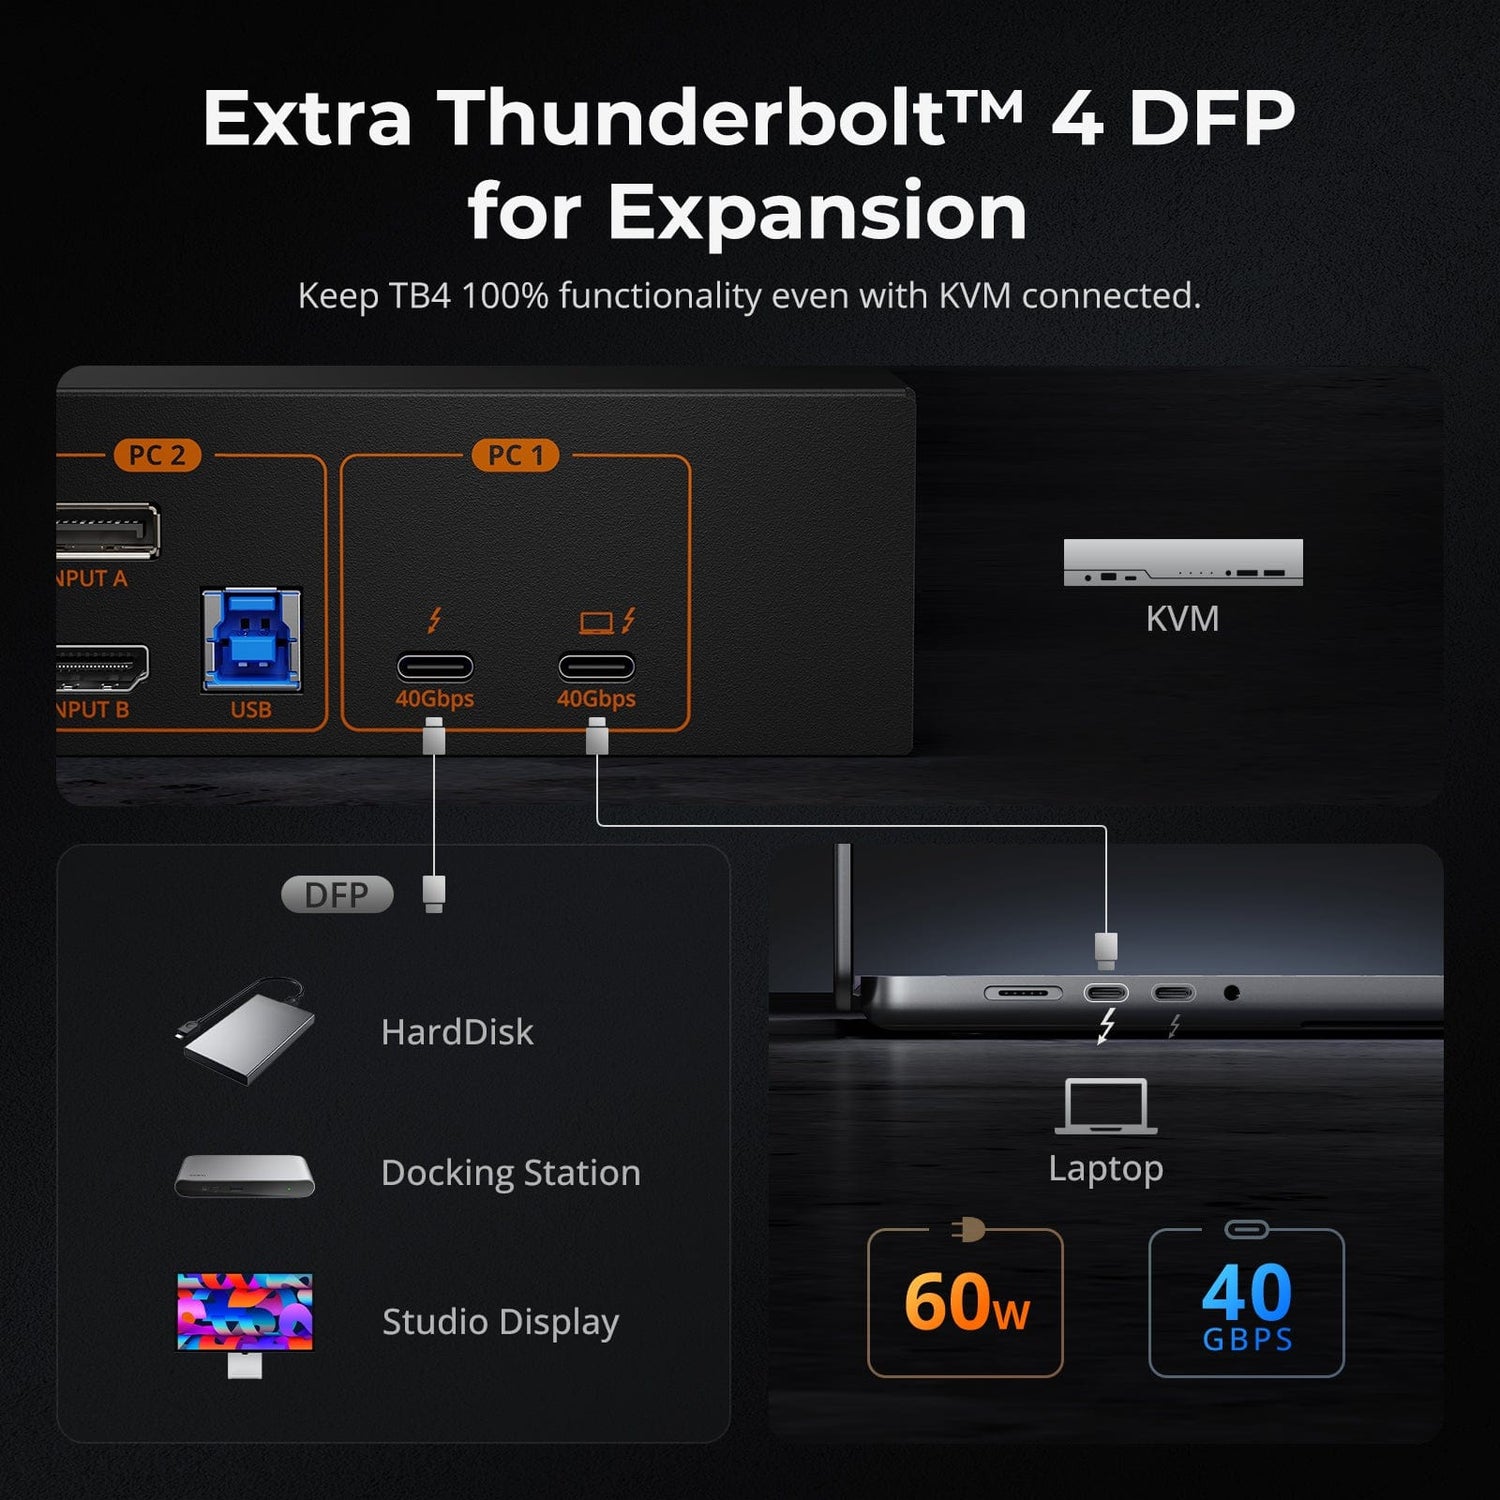
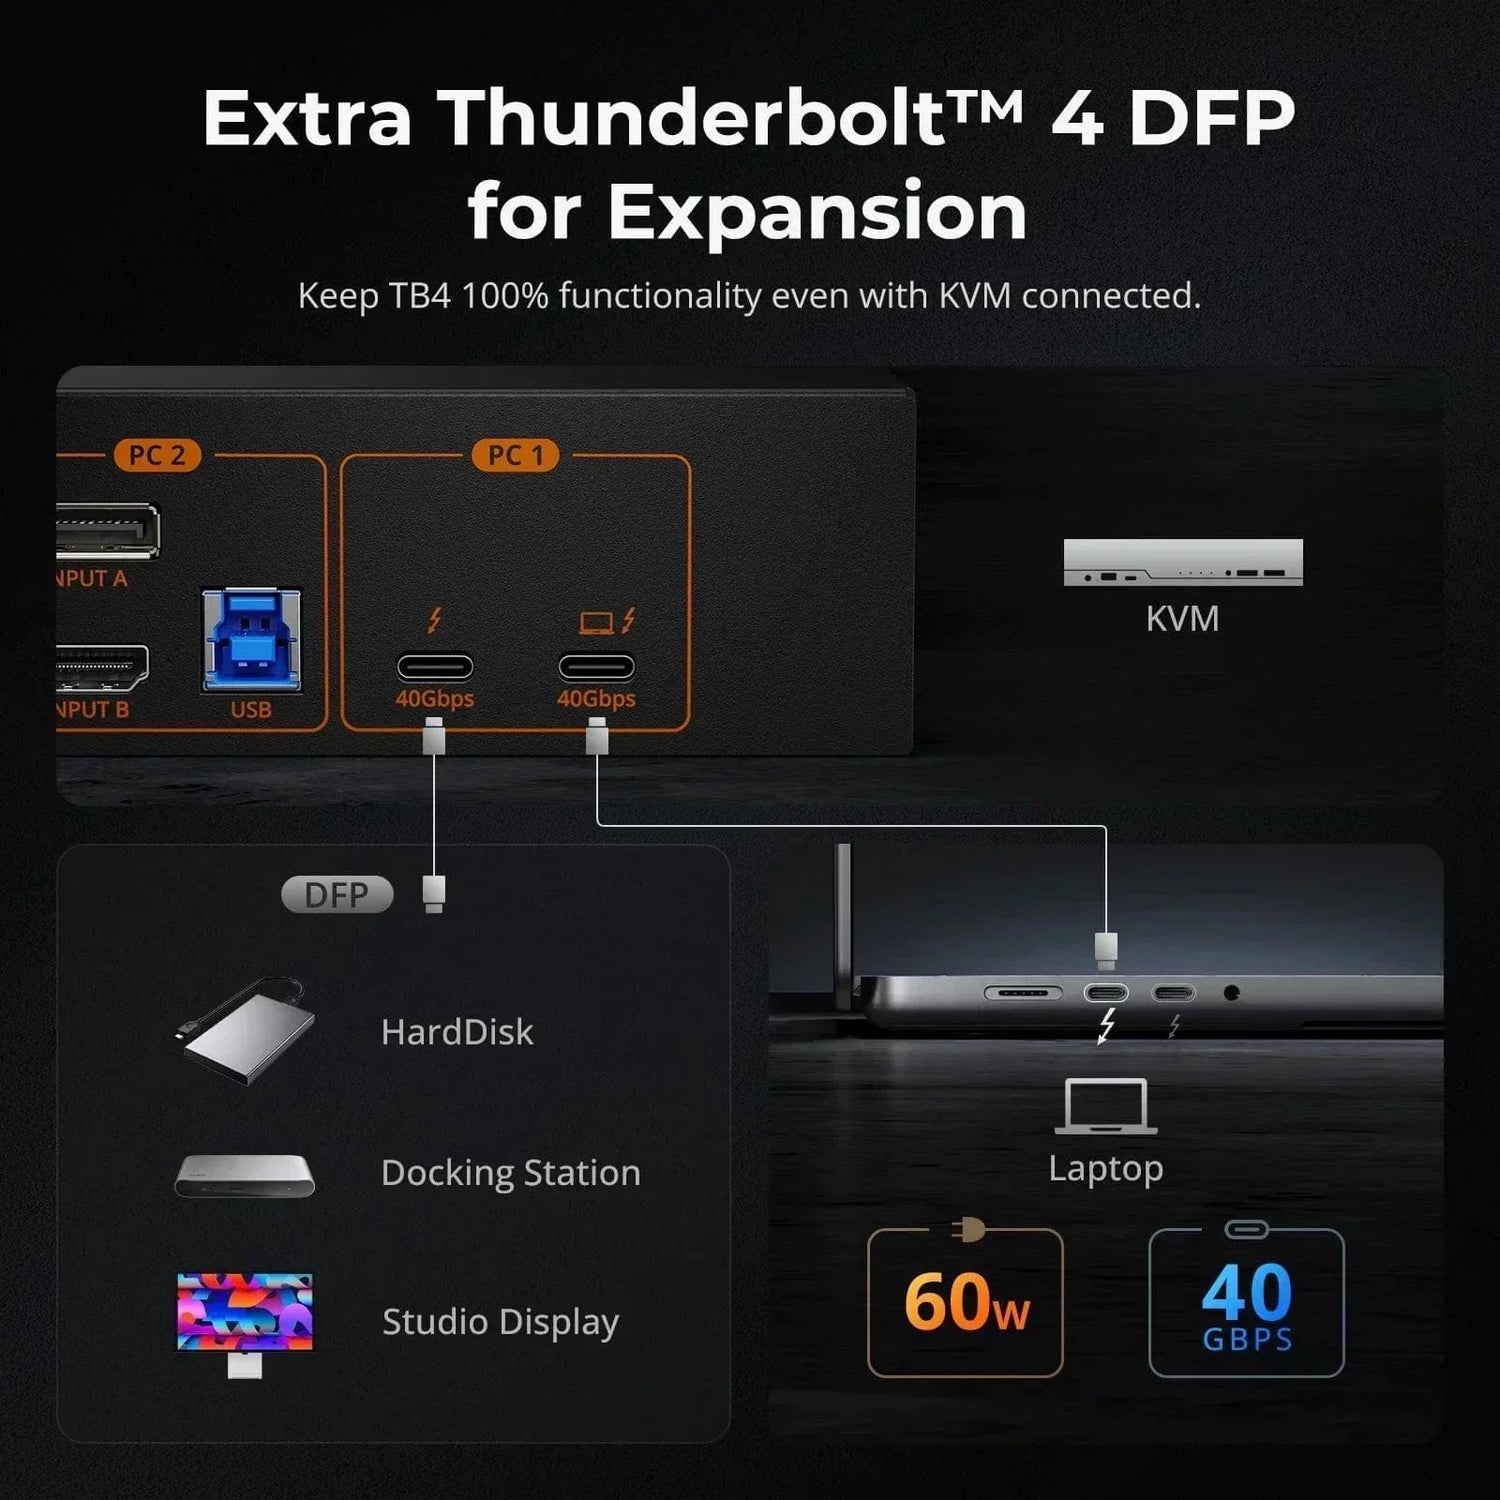
If you own an M1/M2 MacBook Pro or MacBook Air and need to connect two or more 4K displays, your best bet is a DisplayLink docking station or KVM switch. While DisplayLink introduces minor latency, it remains within acceptable limits for regular productivity tasks as long as USB bandwidth is not heavily taxed.
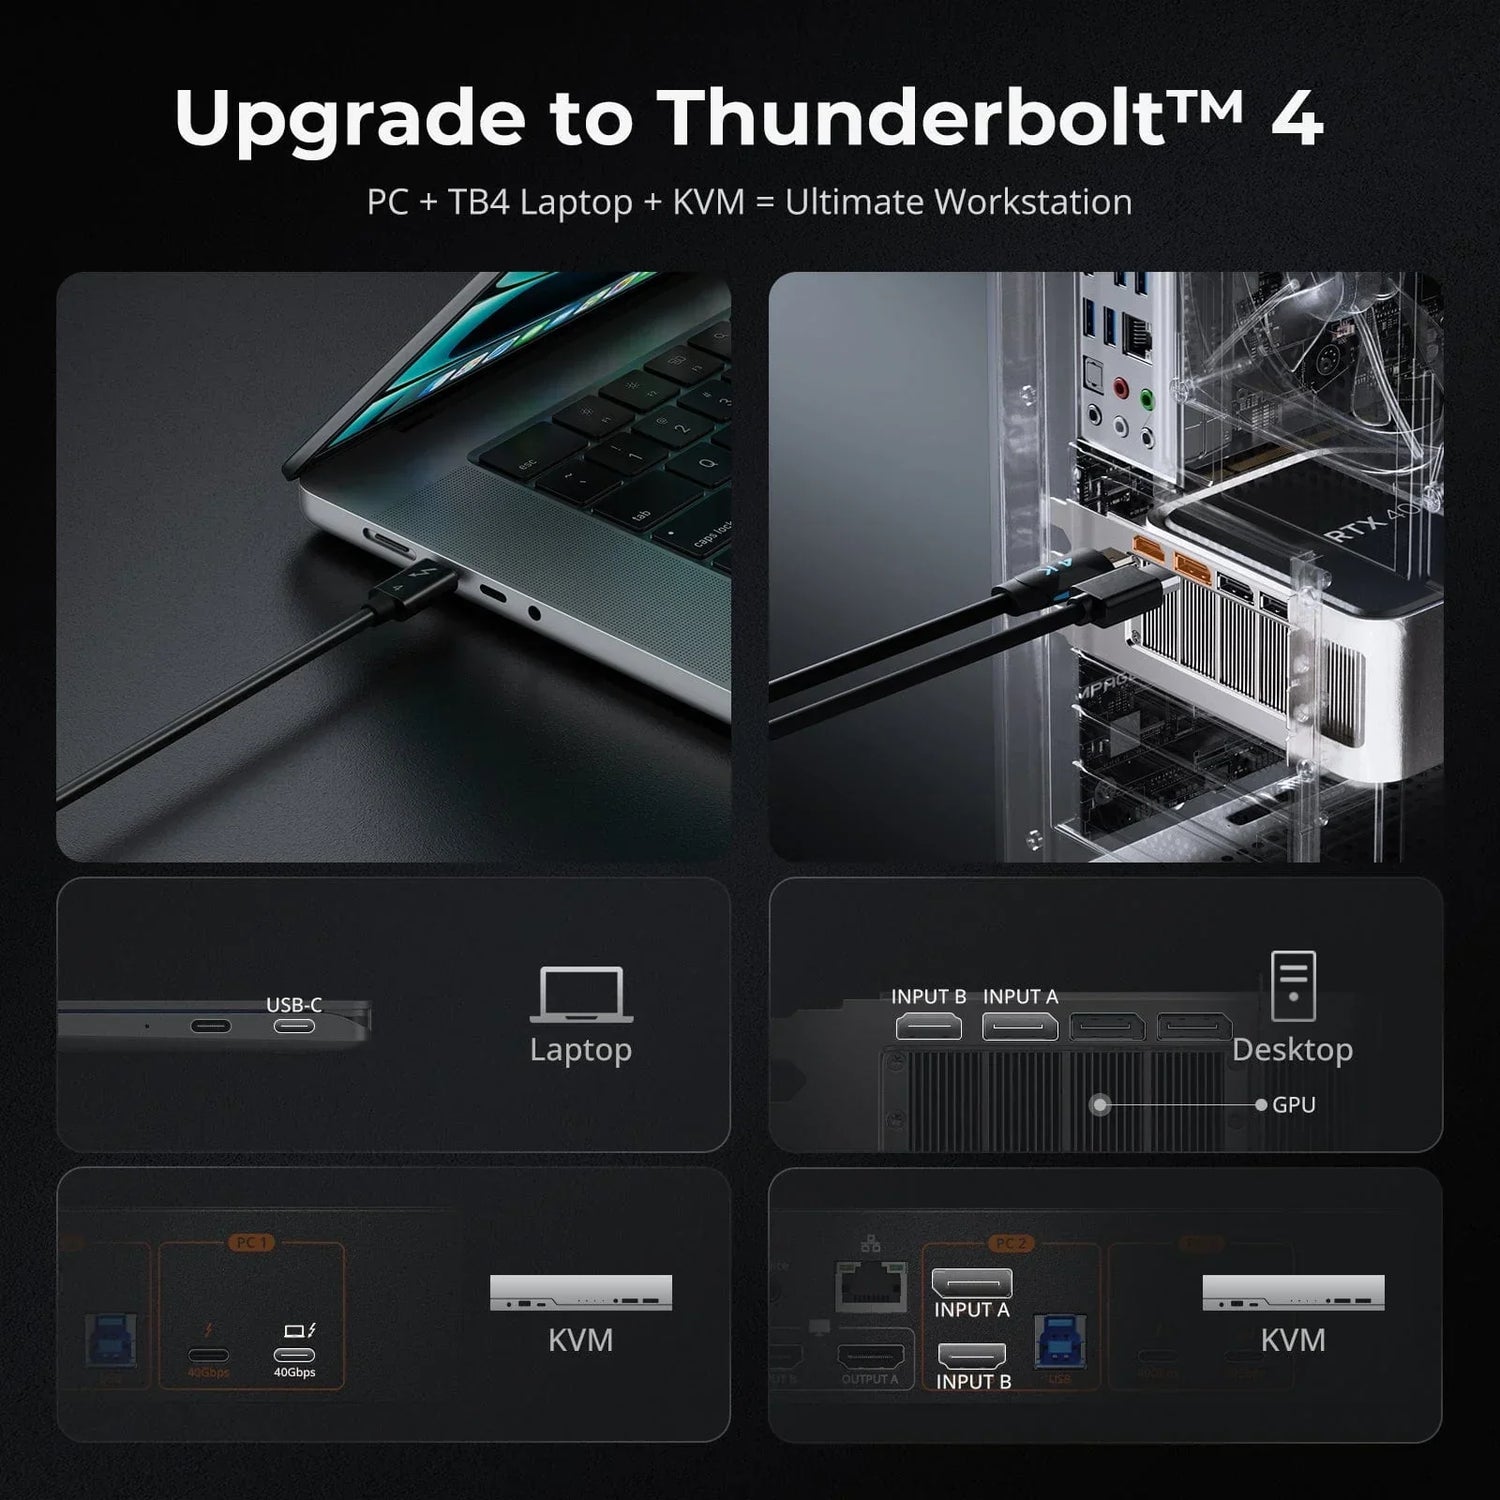
Currently, most DisplayLink docking stations on the market only support dual-display setups. If you need triple display support, I recommend the TESmart KVM switch. Additionally, if, like me, you require a device that allows two computers to be connected and displayed simultaneously, with the ability to easily switch between them, then the TESmart KVM switch is the ideal solution for you.
Real-World Performance Testing
Given that I frequently switch between my MacBook Air and a desktop workstation, I opted for the TESmart HDC203-PM24 KVM switch, which features the DL-6950 chipset and supports 4K60 multi-display setups.
After connecting the KVM switch to the MacBook, you can see the information of three displays in the system report. All three screens are running at a resolution of 4K at 60Hz. (HiDPI was disabled here.)
Since DisplayLink uses software to compress video signals, it relies heavily on the system's CPU. When the video content experiences rapid changes, the CPU resource demands increase compared to when the display is showing static content. Now, let's dive into the real-world performance experience by testing the latency of DisplayLink under different scenarios, such as mirrored and extended displays, varying content types, and different system loads.
Test Setup:
-
Three monitors connected simultaneously
-
Custom script running to display timestamps
-
Local video playback via QuickTime Player
-
Online video streaming using Safari browser: https://www.youtube.com/watch?v=linlz7-Pnvw
-
Browser performance test: https://browserbench.org/Speedometer2.0/
-
Game video: https://www.youtube.com/watch?v=MguHX7p4jA4
-
iPhone 15 Pro used for recording
Testing with DisplayLink in Mirrored Mode
To make it easier to compare the performance of displays connected via DisplayLink in terms of latency and frame rates, we first set the DisplayLink display to mirror the MacBook's built-in display.
-
Left: MacBook built-in display
-
Right: DisplayLink display connected through the TESmart KVM switch
Latency Test in Idle System State
When the system is idle, you can see that the latency between the DisplayLink-connected display and the built-in display is almost negligible.
Latency Test During Local 4K60Hz Video Playback
The latency reaches 25ms during local 4K60Hz video playback.
Latency Test During Online 4K60Hz Video Playback
Interestingly, there's no noticeable latency here. So, why is that? Let's examine the CPU usage:
-
Local video playback: The CPU usage for DisplayLink reaches a staggering 80%.
-
Online video playback using Safari: The CPU usage is only about 40%.
This discrepancy suggests that local video playback puts a higher load on the system due to the video compression and decompression processes managed by DisplayLink, whereas online streaming uses the browser's hardware acceleration and thus consumes fewer CPU resources.
Latency Test During Online 4K60 Video Playback and SSD Speed Test with USB Devices Connected to KVM
At this point, latency reaches 67ms. You can noticeably feel that the mouse response on the DisplayLink display is slower than on the built-in display. This also indicates that for tasks requiring real-time performance, like SSD read/write operations, the system prioritizes bandwidth for those tasks. This ensures that SSD performance remains unaffected by the video signal transmission over DisplayLink, with read/write speeds showing no significant difference compared to when the display is not connected through DisplayLink.
This inevitably made me curious. When the KVM is in operation and other USB devices are consuming a large amount of bandwidth, will the performance of DisplayLink be significantly affected? So, I connected a camera to the USB port of the KVM, streamed an online 4K60 video, and while the hard drive was performing read - write operations, I opened Logi Options+ to verify my idea.
Incredibly, the latency was actually lower than when only conducting SSD speed operations! Perhaps this is the result of DisplayLink's adaptive compression technology and the system's bandwidth allocation mechanism. However, this only simulated a situation where the bandwidth occupation was relatively high. Due to the lack of an SSD with a faster read - write speed at hand, there is no way to test how much latency DisplayLink would have under extreme conditions.
Latency Test During Online 4K60 Video Playback and Browser Performance Testing
When playing 4K60 video and simultaneously running a browser performance test using browserbench, simulating high CPU usage operations while watching video, the latency measured is 14ms, with no significant difference.
Latency Test During 4K60 Gaming Video Playback
When playing video with more dynamic content, the latency is still only 13ms, which is quite minimal even for high-motion video.
Using DisplayLink Display in Extended Mode
Latency Test in Idle System State
As expected, there is no latency when the system is idle, which is consistent with the performance observed during the mirrored display test.
Latency Test During Local 4K60Hz Video Playback
The latency is the same as when using the mirrored display, reaching 22ms.
Latency Test During Online 4K60Hz Video Playback
Again, the latency is almost identical to the mirrored screen setup, with virtually no noticeable delay.
Latency Test During Online 4K60 Video Playback and SSD Speed Test
At this point, latency is 63ms, which is still very close to the latency observed in the mirrored mode.
Latency Test During Online 4K60 Video Playback and Browser Performance Testing
The latency measures 13ms, consistent with the mirrored screen performance.
Latency Test During 4K60 Gaming Video Playback
The latency here is 14ms, also in line with the mirrored screen setup.
Summary
|
Usage Scenarios (in mirrored or extended mode)
|
Latency Situation
|
|
Idle state of the system
|
Almost no latency
|
|
Playing local 4K60Hz video
|
22ms - 25ms
|
|
Streaming online 4K60Hz video
|
Usually no significant latency
|
|
Streaming online 4K60Hz video while conducting an SSD speed test
|
63ms - 67ms
|
|
Conducting a browser performance test while playing online 4K60 video
|
13ms - 14ms
|
|
Playing 4K60 gaming video
|
13ms - 14ms
|
Overall, under various system loads and content types, DisplayLink’s latency remains relatively stable, with most scenarios showing no significant delay that would interfere with daily use. That said, certain operations—like SSD speed tests—can result in higher latency.
Additionally, I began to wonder: Could the KVM switch itself be introducing any additional latency? To investigate this further, I purchased a Plugable UD-6950H for comparison, focusing solely on testing the latency during local video playback and while running both online 4K60 video and SSD speed tests simultaneously.
During local video playback, I observed a latency of 53ms, which is higher than the latency I experienced using the TESmart KVM switch. When simultaneously playing online 4K60 video and running an SSD speed test, the latency measured 63ms, which is nearly identical to the latency observed when using the KVM switch. This indicates that the added latency is not due to the KVM switch itself, but rather a result of DisplayLink's inherent latency.
Throughout the use of both products, I encountered occasional frame drops. These occurrences were infrequent, but for users who are sensitive to such issues, it’s something to consider before making a purchase.
In the end, I returned the Plugable UD-6950H and kept the TESmart KVM switch.
I hope this article helps those of you considering purchasing a DisplayLink product.